The sound editor is where you can load sounds into a new audio resource as well as set its properties. To load a sound, press the Load Sound button to the right of the sound name. A file selector dialogue pops up in which you can select the sound file. This be either a WAV, an MP3 file or an OGG file. In general *.wav are used for the short sound effects as even though they are generally larger files they will play instantaneously due to the fact that they do not need any type of decoding for playing. *.mp3 or *.ogg format files should be used for background music or for sound effects that are longer or larger in size. These files are much smaller than a wave file would be but have a small CPU overhead as they have to be decoded before being played.
Once you have loaded your file you can preview the sound by using the play button which will loop it continuously. This is very handy as it means you can make changes to the volume using the slider at the bottom of the window and hear what the effect it will have on the sound. There is a stop button too, so you can stop the preview at any time.
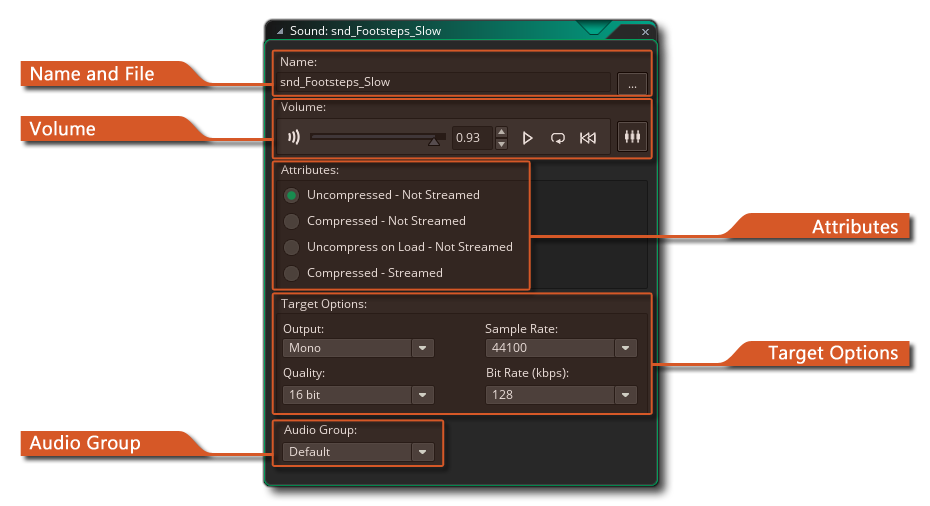
The sound window also has other options which are explained below.
Here you can click the "open" button to open the file explorer and choose an audio file to load. You can also set the name of the new resource from the "Name" field on the left. Names can only be alpha-numeric and may only use the underbar "_" symbol, and they cannot start with a number.
This section is for setting the sound attributes. These are the attributes that will be set when you export your game and will affect how the sound id played back at run-time. For sound effects (WAV format) you will want them to be uncompressed so that they play quickly and don't require decoding, however for OGG and MP3 you'd generally want one of the other three options available.
Compressed audio will force all your sound files (irrespective of whether they are *.wav or *.mp3 or *.ogg) to be compressed down to Ogg Vorbis *.ogg format files for all platforms. These sounds are smaller on disc, but will have a slight CPU overhead due to the need to be uncompressed and loaded into memory before being played, so you should keep that in mind if you wish to use compression in an already CPU intensive game.
You can mitigate this CPU overhead somewhat by choosing to uncompress on load, which will place all the sounds into the device memory for faster playback, at the expense of increased memory use.
If you have chosen compressed audio, you can then also choose to have your sound streamed from disk too. A streamed sound will be one that is uncompressed and played in real time, streamed from the disc rather than loaded into memory. Streaming is ideal for music as it reduces the one-off overhead of uncompressing the whole file, which may cause a pause in the game, but is not recommended for simple sound effects where the hit on the CPU is much less.
It is important to note that when targeting the HTML5 platform. streamed audio will not play on iOS when the play request does not directly originate from a user interaction (i.e: a touch event, etc.). However, since GameMaker Studio 2 queues up click events and only handles them on the next frame, it is impossible to play streamed audio without the browser blocking it. To get around this, any HTML5 game run on an iOS browser will treat all streamed audio as unstreamed in the engine, with the exception of streamed audio not being preloaded.
What this means is that if your game is running on an iOS browser, and - for example - you have 10 music tracks that are all set as streamed mp3 files. All 10 will be initialised like unstreamed audio would, but they won't be decoded immediately before the game loads, unlike normal streamed audio which would get preloaded/decoded immediately during the load screen phase.
While this bypasses the iOS issue and prevents any huge increase in initial load times, it does mean that it may result in a state where your game has loaded, but certain streamed sounds may still be downloading or decoding. To deal with this you can use the GML function audio_sound_is_playable(), which checks to see if a given sound can actually be played. On HTML5 this will return false if the sound is not fully loaded or decoded yet, and true if it is and can be played (on all other platforms it will always return true).
Here you can set the playback volume for the given sound. This is the absolute volume, where if the slider is in the middle - for example - then the maximum volume for that sound when the gain is 1, will be half the recorded volume for the sound. Beside the volume controls you also have the Playback controls where you can preview the sound, set it to loop or rewind. You can also click the
Icon to open the sound in the Sound Mixer (see the section on Mixing Sounds for more information).
The Target Options panel is where you set the conversion rates for your game. These settings will affect how the sound is exported for the target platform, and GameMaker Studio 2 will automatically convert your sound files for you - you simply control the final quality of those sounds when converted. Generally the default settings of 16 bit, 44100kHz and 192kbps are perfectly adequate, but it may be that you wish sound effects (for example) to have a lower quality and music to have a higher quality, in which case these settings can be changed.
You can also choose whether the conversion should be mono, stereo or 3D. If you plan on using the audio emitter functions to create 3D sound effects, you should indicate this here, otherwise choose mono or stereo depending on the use that the sounds are going to be put to. If you choose to use the sound for 3D audio, it will be exported as a mono sound.
NOTE: The higher the quality, the larger the file, and this should be taken into account when deciding what bitrate to choose.
You can assign your audio file to a specific Audio group. These are created from the Audio Groups window and are used to group audio assets together for easier memory management and volume control. Once an audio file has been assigned to a group you can then use the specific audio group functions to change them and lo load/unload them from memory. See the reference section on Audio Functions for further information. Note that while the rest of the audio properties are configuration specific, the audio group setting is not and a sound will belong to the same group on all configurations that you use.
Note that apart from these options for individual sounds, you can also preview and mix sounds using the dedicated Sound Mixer