 At some point while creating your games you may need
one of your instances to follow a path through a level. Now, this
can be done in code by simply creating an array of positions within
the room and then having an instance move between them, but that
can be a chore to set up and is difficult to change, test and adapt
for different instances. For this reason GameMaker Studio 2
has path resources and a dedicated path editor.
At some point while creating your games you may need
one of your instances to follow a path through a level. Now, this
can be done in code by simply creating an array of positions within
the room and then having an instance move between them, but that
can be a chore to set up and is difficult to change, test and adapt
for different instances. For this reason GameMaker Studio 2
has path resources and a dedicated path editor.
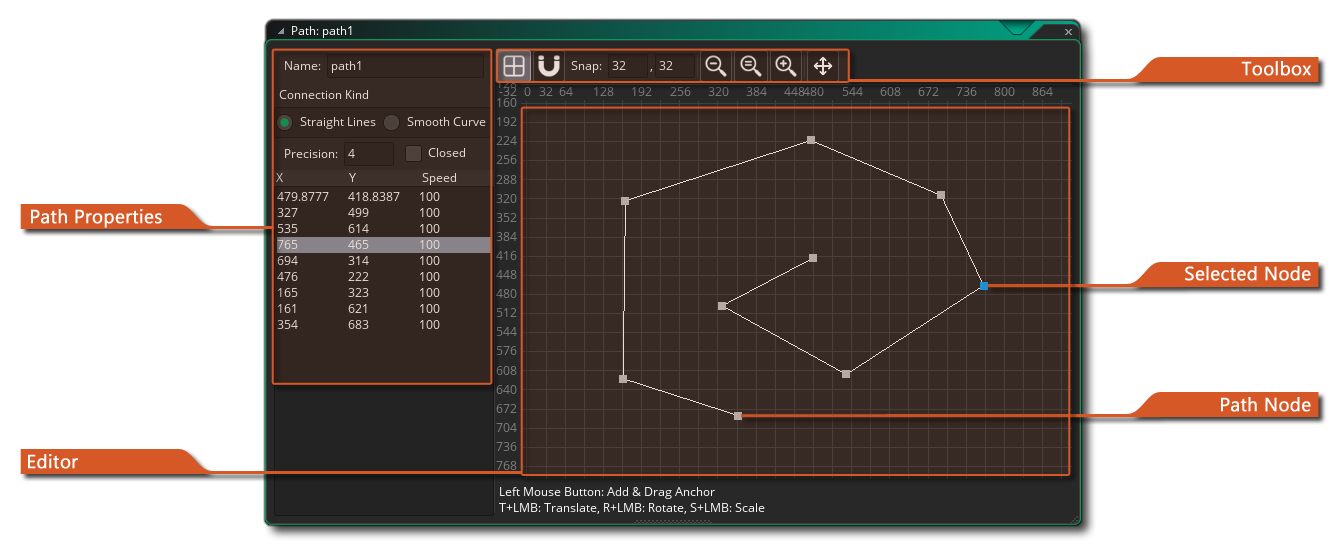
The basic idea is rather simple - you define a path by drawing it in the path editor, then you can place an action (or code) in the creation event of an object to tell the instance to follow that particular path. You can also set the speed to follow the path and a number of other actions relating to the position and orientation of the path within the room. When you first create a path resource the path editor window will open with the following options:
As with all resources in GameMaker Studio 2 you should give your new path a unique name as this is what will be used to identify it throughout the game you are making, and a good system that a lot of people use is to prefix (or suffix) the resource for easy recognition in code or actions (eg: path_Enemy_1 or PowerUp_path). Once you have named the path, you can start to define it by placing points in the main editor on the right, with each point being added to the list here along with its position and speed.
You can edit each value in the path properties by double clicking
on it and entering a value. The speed value for path points is defined by a percentage of the speed at which you make the instance move along the path (default is 100%). So if you start an instance at a speed of 2 (2 pixels per step) along a path and then one of the path points has a speed value of 50%, the instance will reduce speed as it approaches this points to a speed of 1 (50% of the path speed). Equally, you can set the speed to 150% and the instance will accelerate as it reaches the point. In this way you can create some nice dynamic looking movement without any code whatsoever.
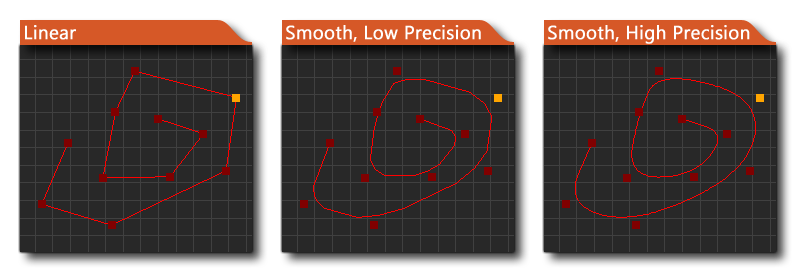
You can also specify the connection kind for the whole path and whether the path should be closed or not (a closed path will connect the last point on the path with the first). The connection kind can be either straight line, or smooth where a straight line connect simply connects the points of a path in a linear basis, with angular changes at each point, while a smooth connection will create a much softer path that may not pass directly through any of the points, but rather take an approximate line, creating nice curves. You can also specify the precision for the curves (default is 4) which can be from 1 to 8 with 8 being the smoothest. The image below shows an example of how these options affect the path:
You can add points to the path clicking
/
and left click
to delete the selected point or points too.
There is an additional menu available to you in the editor window when you right click, shown below:
Each of the items in this menu work as follows:
- Edit Points - Edit the path points.
- Pan To Path - Pan the view in the editor to the center of the path.
- Reverse - Reverse the order of the path points. This doesn't move them, but rather changes the order that they will be processed in so that the start becomes the end and vice-versa.
- Flip - Flip the path along the horizontal axis.
- Minrror - Flip the path along the vertical axis.
- Delete Points - Delete the selected point or points.
The tool box buttons at the top are where you can control how things are drawn in the editor window. You can toggle the background grid on or off, as well as set the addition of path points to either be snapped to this grid or not. The snap values indicate the size of the grid cells and this can be changed to any value you require. The rest of the tools are dedicated to zooming and panning the editor area, and you can click the (=) button to reset to be 1:1 with the display. Note that if you pan too far from where you want to draw the path, you can use the right mouse button menu, and then click pan to path to scroll back to where you were working.
Paths are simply a collection of points joined together by a line. In the editor, you place these points by using the left mouse button. You can add points anywhere in the room editor and they will be added to the point list consecutively to make a path. If you place a point near a connecting line or another node, the new point will be inserted in the path rather than added to it (you can set the detection distance for this in the Preferences). You can press
and select "Delete Point" or press the
Note that you can also use the following shortcuts to perform some extra operations that are not available through the right mouse button menu on the choose path point(s):
- T +
- R +
- S +