Objects are the resource that we use to control aspects of a game and to do specific things. Most of the time they have a sprite associated with them so that you see them in the game rooms, but sometimes they are used as a "behind the scenes" controller to do things related to the user or for timing, etc... They can be given behaviours and they can react to certain events as well as to each other, and most of the things you see in a game are based on objects and their interactions. Now, we say "based on" because you don't actually place objects directly into the game rooms, but rather you place instances of these objects which are basically copies (or clones if you prefer) of the object resource. This is a very important thing to remember as instances and objects are not the same thing and each have their own set of functions that can affect them.
To clarify this, think of a game made with GameMaker Studio 2. All the characters, monsters, balls, walls, etc... are all objects you create in the resource tree. You then drag the object into a room in the Room Editor to create an instance copied from the basic object template. The instance in the room can then be changed in the editor itself or through code, so that it can be scaled, or coloured, or have other details modified from the "base" object. So when we talk about something affecting or changing an instance, we mean it affects that one particular copy of an object in a room. Only that single instance is being affected while all the rest are not. But, when we talk about affecting or changing an object, we mean that we are modifying the object in the resource tree and anything we do to it will be reflected in all the instances created from that point on too. So, the object is the template for the instance, and the instance is what we place in a room to make our game.
To create an object in your game, you can right click
![]() on the object resource folder and click the Create option.
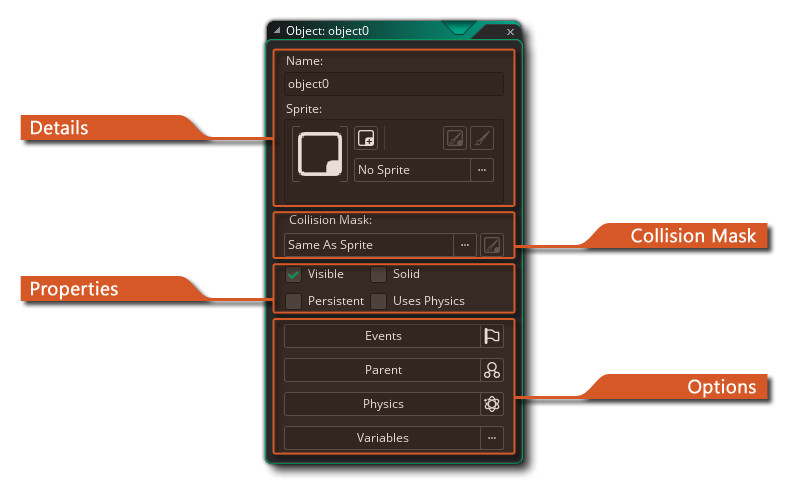
This will open the window pictured at the top of this page with the
following sections:
on the object resource folder and click the Create option.
This will open the window pictured at the top of this page with the
following sections:
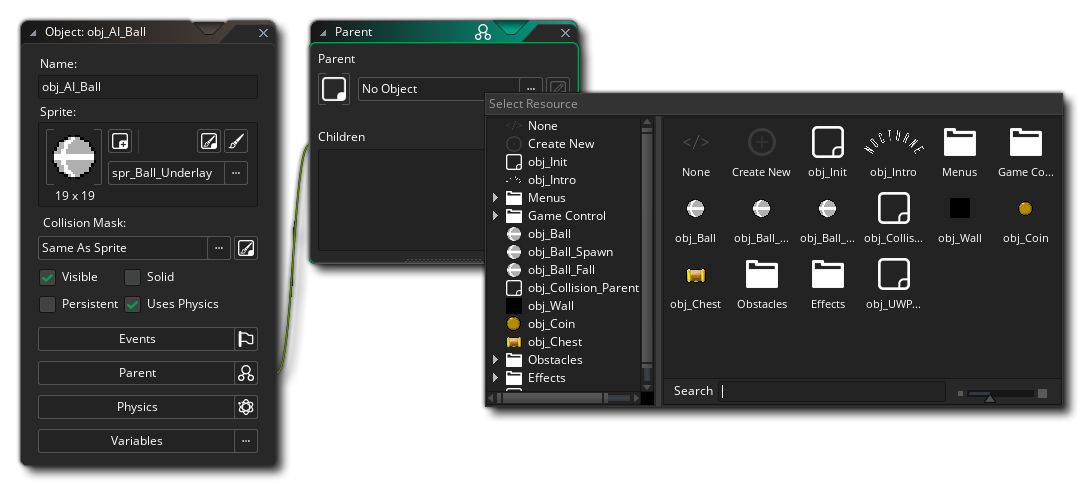
Here you can give your object a name. This name should never contain spaces nor unauthorized characters (only alpha-numeric characters and the underbar "_" are allowed) and should be short but memorable so that you can easily identify resources later when you may have many of them. For example many people use a prefix or a suffix to identify the differences between resources, like "obj_Ship" or "Ship_obj".
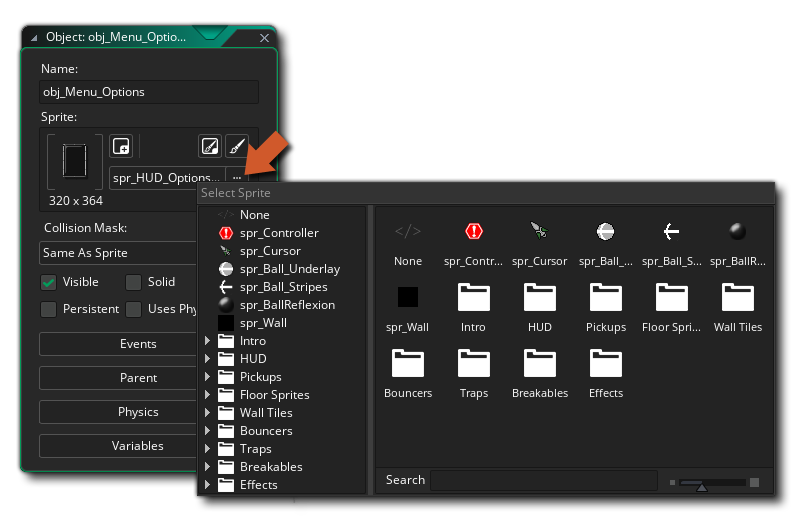
Next you can choose the sprite for the object should you wish it to have one. Click with the left mouse button
on the sprite box and the Asset Explorer will appear with a list of all the available sprites from the resource tree:
You can then select the one you want to use for the object. With a sprite assigned to the object you can click the Edit Sprite button
to change the sprite properties, or if you do not have a sprite for the object but wish to create one you can click the Add Sprite button
to create a new sprite resource and assign that. You can also edit the sprite resource image that has been assigned by clicking the Edit Image button
to open the Image Editor.
Beneath the sprite assignment area you have a button for choosing a specific Collision Mask. By default an object will use the collision properties of the sprite assigned to it, but there are cases whereby you may want collisions to be based off of a different mask shape. For example, you may have a top down game where the main sprite has a rectangular collision mask, but to make collisions smoother a circular mask may be better. In these cases you can click the Collision Mask button and select another sprite resource, so now instances of the object will draw the assigned sprite, but base collisions off of the mask sprite.
Here you are presented with the following options for your object:
Visible indicates whether instances of this object are visible when the room starts. Normally most instances are visible but sometimes it is useful to have invisible ones - for example, you can use them for way-points to control a moving monster, or to keep track values and perform certain timed actions. Invisible objects will still react to events and if they have a sprite or a mask assigned to them, they will also react should other instances collide with them... they just cannot be seen and do not perform their draw event. By default, the visible flag is checked.
When you flag an instance as being solid, you are telling GameMaker Studio 2 that it should try to resolve any collisions before triggering a collision event. This is a very basic functionality, and in reality all it does is move the instance back to the position it was in the moment before a collision was detected before performing any code or DnD™ that is in the event itself, and as such is of limited use.
Persistent - A persistent object is one that does not go away when the room is changed, but rather it "persists" and is carried over into the new room. It will only disappear when you explicitly destroy it, either with a destroy action or in code. This means that if you place a persistent object in one room, it will still be available in all subsequent rooms and will continue to perform any actions assigned to the events in its object properties, except the create event, which is only fired once when it is created initially and not when you change to a new room. This is handy for when you have, for example, a main character that moves from room to room and you want to maintain the variables within that object the same, but you should take great care to create and destroy persistent objects correctly as you can easily get errors creeping into your project by mistake.
When you create an instance with persistence enabled in a room, it will be assigned a layer or a depth (depending on which function you used to create the instance of the object). When the room is changed, and if the following room does not have a layer with the same name or depth as the one assigned, then a new layer will be created for the instance that is persisting across the rooms. If you gave a named layer when the instance was created, then the new layer will also be named the same as original layer, while if you assigned a depth to the instance then the new layer will be named "_layer_XXX", where "XXX" is a hex value used to give the layer a unique name. These layers will be removed from the room on Room End. Another thing to note about layers and persistent instances is that if you have assigned the instance a named layer on creation, and there is another layer in the following rooms with the same name, then the persisted instance will be assigned to the layer with the same name regardless of the depth of the layer. Finally, if a persisted instance moves to a room with a layer at the same depth as the instance was created on, it will not be assigned to this layer, but instead a new layer will be created at the same depth (following the naming convention explained previously).
Note too that a persistent object will still have its Game Start, Game End, Room Start and Room End events triggered, however if you restart the game (with, for example, the game_restart() function) all persistent objects will be removed and only exist when created again by the game. Also note that if you deactivate a persistent object, it will no longer pass from one room to another unless re-activated before the Room End event is triggered. Re-activation requires a full game step to occur, so using the actual Room End event for this does not work, as it doesn't give the game a full step to reactivate the object.
When you check the Uses Physics box you are telling GameMaker Studio 2 that this object should be part of a physics world. Checking this will also open a further chained window where you can define the physical properties of all instances of this object. More information on this can be found further down this page in the section on Physics.
Options
The options section defines the different property options for your object and how the instances will behave when placed in a room. Here you add events, which are the "building blocks" of your game code, set whether the object is to have a parent and also set the physics properties if you want to enable the physics functions.
So, what are events? Basically, these are discreet moments in the game loop where things are made to happen based on what you have programmed for them. GameMaker Studio 2 works with cycles of these events - from the moment a room is started to the moment it is finished there is a game loop running where every step (a step is a moment in game time, governed by the room speed setting) a series of events are run or checked, and you can choose to place code or DnD actions in your objects that respond to these events.
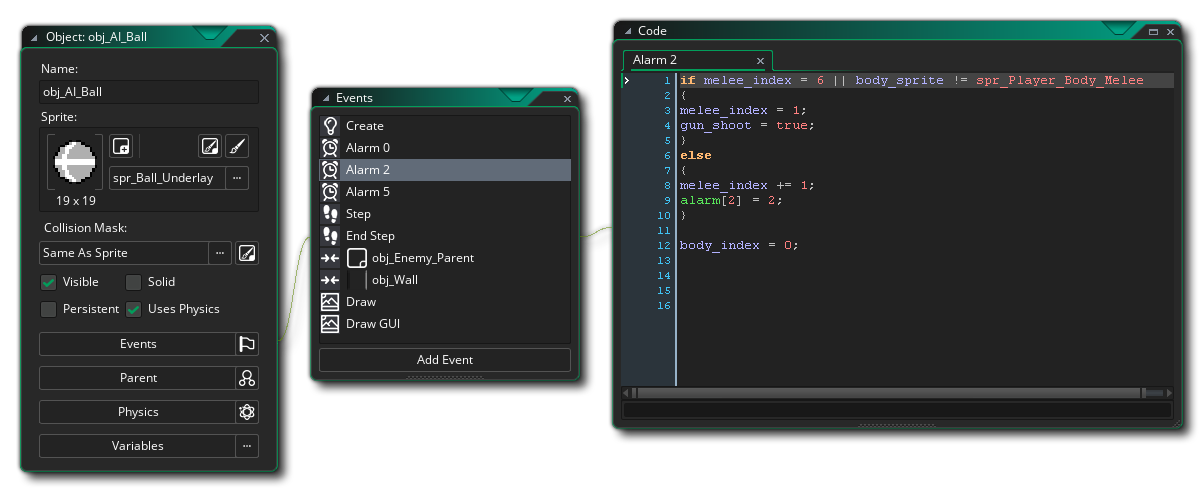
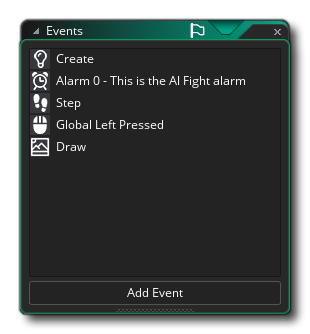
Let's look at a typical object setup with events and code:
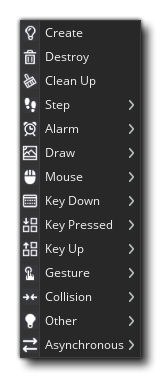
As you can see in our example object there are a number of events listed that it should respond to, but initially when you create an object this list is empty and you must decide which events you need and what instances of that object should do when those events are triggered. To add events into the object, you press the Add Event button found at the bottom of the events list which will bring up the following window:
That is the list of all the basic events which an object can respond to, although some of those events also have sub events to further refine behaviours. For example, if you add a Key Press
event you will then get a further window popping up with the sub events that allow you to select which key the object should respond to. Once you have selected your event, the code window will be chained to it and open up on the right. You can now edit the code to give your object a specific behaviour or reaction to that event.
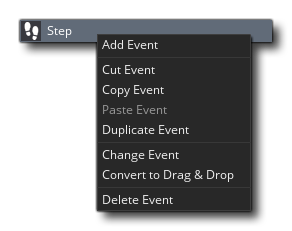
You can click the right mouse button
on any event to get the following menu options:
These options are:
- Add Event - Add a new event from the event list.
- Cut / Copy / Paste Events - Cut, copy or paste the selected event. You can use the standard keyboard shortcuts too:
/
+ X,
- Duplicate Event - Duplicate the chosen event. This will take the contents of the chosen event and duplicate them in another event that you specify.
- Change Event - Change the event. This will prompt you to choose another event category and once selected the contents of the current event will be changed to the new event (removing the original event in the process).
- Convert To Drag and Drop / Code - Object events will be created using the method chosen when you created the project, either using code or using Drag and Drop actions. With this option you can convert from one to the other, regardless of the project type.
- Delete Event - Delete the event (or events).
When removing events, you can use
+
You should also note that you can name events, or at least give them a short descriptive text that will be shown beside them in the Event Editor. To do this, simply add the following into the very first line of the code editor for the event:
/// @description Your text here
So, you could have something like this in - for example - an Alarm event
/// @description This is the AI Fight alarm
And now in your Event Editor you'll see this:
Note that the section on events above simply gives an overview of how they work, but for full details on all the avaialble events, please see the following section:
The other options for an object are:
When working with objects in the GameMaker Studio 2 IDE, you can set up Parent / Child hierarchies. This is done by clicking the "Parent" button in the object editor and then choosing another object from the resource tree to be the "parent" of the one being edited:
So, every object in your game project can have a parent object, but what does this mean? Well, when an object has a parent assigned it can share code, actions and events with that parent. This sharing is called "inheritance" and an object that has a parent is called a "child" object. Not only can a child share code with its parent, but you can do checks and run code on parent objects and it will automatically include the child objects too, which saves a lot of time and energy.
If that sounds complicated, then another way to look at a parent object is as a way to "group" objects together under the same umbrella and have them share certain things without losing their own unique identity. Maybe that still doesn't clarify things too much, so let's give some examples...
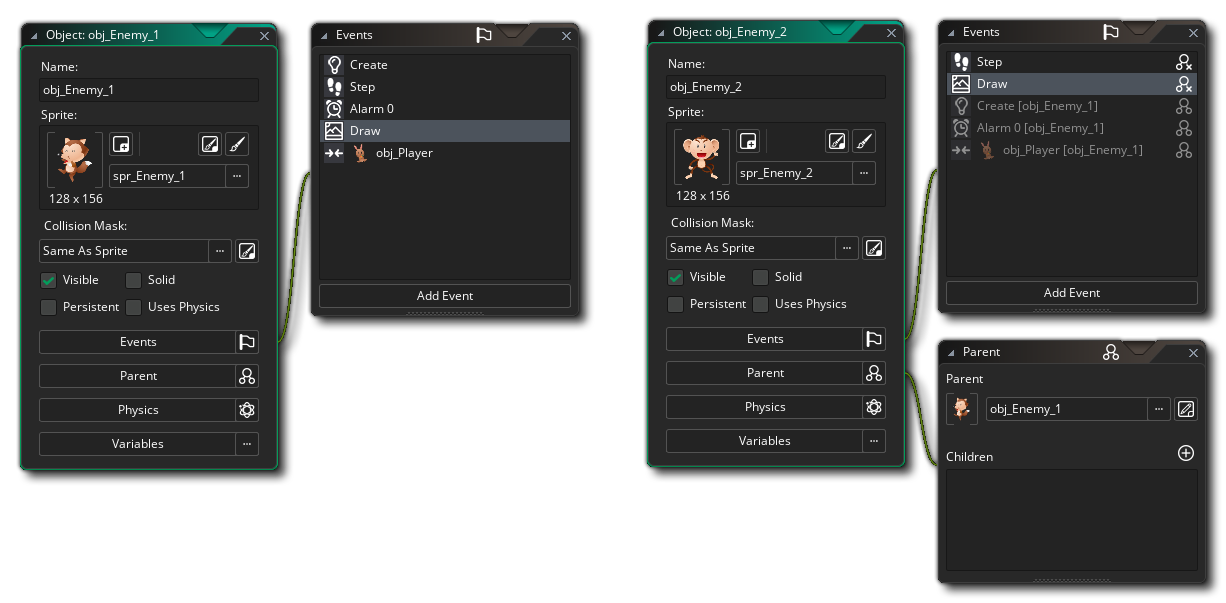
Say you have a "player" object and four different "enemy" objects. Now, you want the player to die if he touches any of these four objects and this would normally entail four different collision events with four different sets of actions or code, one for each of the enemy objects. BUT if we make a parent object for all the enemies, then we can create one collision event with the parent object only and it will trigger no matter which one of the four "child" enemy objects touch the player. Handy stuff! In the actual GameMaker Studio 2 object you would see something like this:
On the left we have four separate collision events and on the right we have a single collision event, as we have created a "parent" object and assigned all the enemy objects to it. Note that a parent object doesn't have to have any events or code in it...
Another example of parenting would be if you have a game where you want to create 10 different looking objects and have them all behave in the same way. For that you would create one parent object and in that have all your behaviour actions or code in the required events, and then you would create your ten objects with no actions or code, but different sprites, and assign them your parent object. Now, when you place these instances in a room they will all behave the same, but look different, since they will "inherit" the events of the parent.
Finally you can use parenting to "mix and match" events and behaviours. We'll illustrate this with one final example... Say you want two monsters: one that moves up and down, while another that moves left and right, but you also want the two of them to have the same health, shoot at the player and hurt the player if they collide with them. In this case you can see that almost all events should have the same actions except for one or two that govern movement. So, again, we can make one object the parent of the other, but in this case we also define certain events for the child object. These events "override" the parent events, meaning that whenever an event for the child object contains actions, these are executed instead of the actions contained in the event of the parent. If you also want to execute the parent event you can call the so-called "inherited" event using the function event_inherited(), or the DnD™ action Call Parent Event.
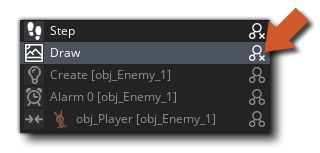
On the left above is the parent object with 5 events in it, and on the right you can see the "child" object. The child object also has 5 events in it, but two of them override the inherited events from the parent (the Step and Draw events) and the other three are greyed out as they are the events inherited from the parent. Inherited events will also have the "parent override" icon beside them in the Event Editor:
When you click
Here you can choose two Open the parent event to inspect the code, or you can choose to Inherit the event or Override the event. If you choose Inherit then the code editor will open with the funtion event_inherited() already added to it (or the Call Parent Event action if using DnD™). Any further code you place in this event will now be run as well as the code that the parent object has. If you choose to Override the event, then the code window will also open, only now the event_inherited() function won't be called, so anything you add here will be run instead of the code in the parent object.
NOTE: From the code editor you can quickly navigate to the parent object by clicking the right mouse button
Whenever you target a parent object in code, the code will also apply to the "children" of the parent object too. This happens when, in an action, you indicate that the action must be applied to instances of a certain object, and in code it happens when you use the with() statement. It will work like this too when you call code functions, like instance_position, instance_number, etc... where if you supply a parent object then all instances of the parent and child instances will be included in the checks. Finally, parenting works when you refer to variables in other objects too, like in the above monster example if I set the enemy 1 speed to 10, then the enemy 2 speed will also go to ten as it is a child object of enemy 1.It is generally considered good practice in most cases to create one base parent object and have this base object contain all the default behaviour but never use an instance of it in the game. Rather use all child objects and only use the parent in situations like those I have outlined above, for collisions, for referencing variables, etc... You should also realise that parents can have parents too! Obviously you can't create a cycle of "parent 1 is child of parent 2 is child of parent 1" but you can create what is called "object hierarchy" where "parent3 is child of parent2 is child of parent1". This is extremely useful to keep your game structured and you are strongly advised to learn to use this mechanism.
When you first create a new object resource, there is a check-box marked Uses Physics, which is not checked by default. Selecting this option will radically change the behaviour of your object when an instance of it is placed in a room, as this switches on the object's physical properties and means that its "traditional" movement and collision functions are no longer valid (but only when the room it is placed on is also marked as being a physics room. See - The Room Editor). When you check this, the object resource window opens a new chained window for the physics editor:
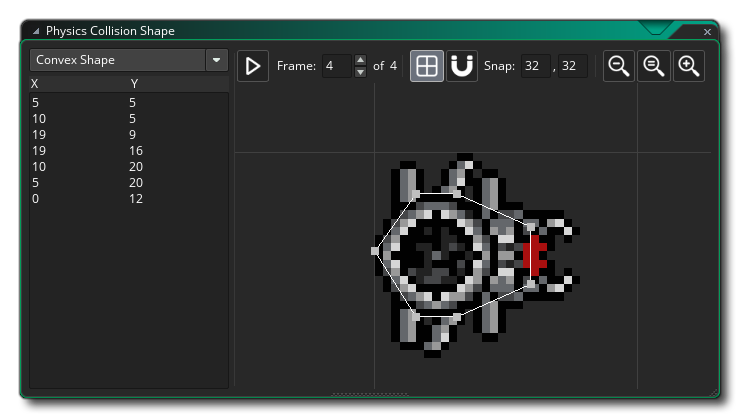
Before you start to edit the values for the physics behaviours it's a good idea to first set the collision shape. With the "normal" collision system your collisions are based off of the mask of the sprite assigned to the object, but with physics enabled this is no longer the case. We need to assign a collision shape the object ourselves (this is properly called a fixture, see The Physics Functions for more information), which can either be a circle, a rectangle or a polygon shape that you yourself define. Clicking on the Modify Collision Shape button will open the following chained window to edit the shape:
This looks similar to the Path Editor, and functions in much the same way. However, depending on the mask you have chosen, it can be rather more restrictive:
- If you have a circular mask, then you can only pull any of the path points to make the circle diameter larger or smaller
- If you have rectangular mask, then you can move any of the four corners, but the corresponding ones will adjust position automatically to always maintain a rectangle
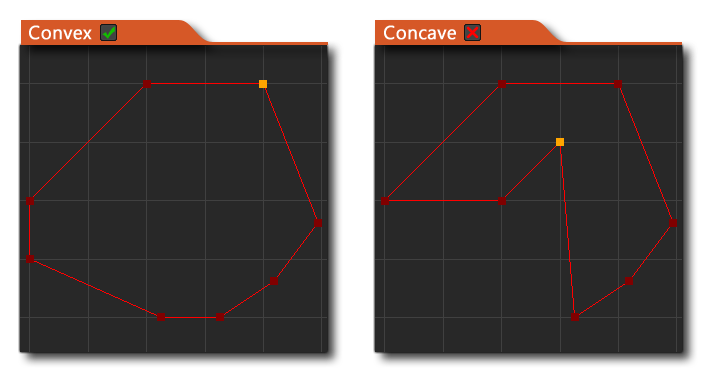
- If you have a custom (polygon) mask, it must have a minimum of 3 and a maximum of 8 points to it, and it must be convex (see image below).
Once you have set up your shape, you then need to define the basic physical properties that your object is to have. These are configured by changing the following parameters:
The density of something is defined as its mass per unit volume, which basically means how much mass is crammed into the space it takes up in the world. So, a balloon would have a low density as it has little mass that occupies a large space, while a lead bar would have a high density as it has a great mass, yet occupies little space. In the GameMaker Studio 2 2D physics world, mass is calculated automatically for you from the values you input for the density and by the surface area of the shape you define for the fixture. This will have a direct impact on how much inertia a fixture has as well as how it reacts to collisions and forces, so if you make a small shape with a high density it will have a very large mass (like a bar of lead), but if you define a large shape with a low density it will have a much smaller mass (like a balloon).
In physics, restitution is defined as "the return of an object or system to its original state after elastic deformation", but as the fixtures in the GameMaker Studio 2 are really rigid bodies and cannot be deformed, restitution is really a way of saying how "bouncy" the fixture is. This setting will affect how much an object "bounces" when it collides with other objects and is co-dependant on other forces that act on the instance like gravity and friction.
By default, the collision group for all physics objects is 0, and this means that they will interact as normal, which in turn means they must have a collision event to interact (a simple comment will do to trigger the collision) otherwise no collision will be registered. However, you can also specify that an object should belong to a specific collision group. By assigning objects to a positive collision group (ie: three objects are all in group "2") you are telling GameMaker Studio 2 that instances of these objects should always collide, even if they have nothing in their collision event, obeying the physical properties that you have assigned them and the room they are in. Conversely, if you have objects with a negative collision group (ie: four objects assigned "-1"), you are telling GameMaker Studio 2 that these should never collide, and any collision events between them will be ignored.
NOTE: Using collision groups dramatically increases the processing required by the physics system and should be used only when absolutely necessary, and you should have as few groups as possible.
Damping is used to reduce the physics world velocity of an instance, and differs from friction in that friction only occurs when two instances with collision shapes (fixtures) are in contact. Damping is also much cheaper to simulate than friction, but please note that damping is not a replacement for friction; the two effects can, and should, be used together.
If you think about any rotating object in the "real world", unless it has a motor or is in space, it slows down over time due to the influence of external forces (like friction with the air around it). We can use set this option to simulate this effect and reduce the velocity of rotation of instances in the physics world, as, without it, any rotating instance would continue to rotate infinitely.
Friction is the force that resists the relative motion of material elements sliding against each other, which in the GameMaker Studio 2 physics world, translates as the loss of momentum caused by the collision of two instances with fixtures bound to them. So, when two instances collide, their motion is affected by this value, with a high friction causing a larger loss of momentum than a lower value.
Finally there are three extra options that can flagged as on or off for your fixture, Sensor, Start Awake and Kinematic. Each of these flags will change the behaviour of your fixture in the following ways:
By checking this box, you are telling GameMaker Studio 2 to basically "ignore" the physical properties of the object, but still return a collision event with the objects around it. in this way you can have an instance with no physical presence in the room, but which can react to the collision of another instance, like the player, and do something in turn, like open a door, or trigger some sort of action in another place in the room.
NOTE: A sensor fixture will fire off the collision event when the collision first occurs only, meaning you don't get a stream of collision events as the two bodies continue to overlap (which is what would traditionally occur). If they stop overlapping and overlap subsequently there will be another collision event triggered.
This is checked by default and represents the initial "state" of the fixture at the start of the room it has been placed in. Normally you want it to be awake (ie: participating in the physics world) right from the start, but sometimes this can lead to certain instabilities and unwanted effects due to the abrupt start of the physics simulation. To avoid these effects, you can un-check this flag and the instance will be created with the fixture asleep, and it will not participate in the physics simulation unless something acts upon it.
There will be certain instances in a physics based game which you want to move around but do not wish to be acted on by forces such as gravity, nor forces incurred by collisions with dynamic objects (think of moving platforms in a platform game, for example). For such objects simply setting the density of the fixture to 0 will mean that the physics will assume that the object is intended to be static and it will not react at all to anything. However, checking this box will make a static object kinematic and although it will be unaffected by collisions and gravity, it can still be moved around or rotated using the appropriate variables.
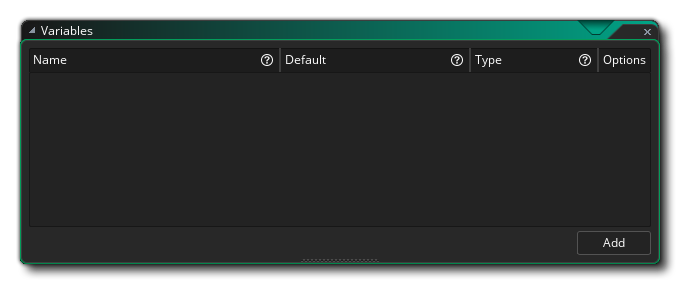
When you click on the Variables button it will open up the Object Variables window, which you can then use to generate any number of variables before the Create Event:
In this window you can click on the Add a new variable
button to add a new variable to the list. You can then name the variable as well as set the type of variable it has to use and adjust its properties:
The variable name must start with a letter and can contain only letters, numbers, and the underscore symbol '_' with a maximum length of 64 symbols. So, valid variables are things like fish, foo_bar, num1, and invalid variables would be 6fish, foo bar, or *num. Once you have given the name of the variable you need to set its type, which can be any of the following:
It is worth noting that this feature is particularly useful when working with parent/child instances - since you can have a parent object with a set of defined variables and then simply modify them in child object (see the section Object Variables And Child Objects below for more details) - and for when you add instances into the Room Editor (see the section on Layers > Instance Layer), since you can also modify these variables for individual instances that have been placed in the room.
The different types of variable that you can create are listed below:
- Real: A real number is any number that is not a whole integer and can be positive or negative. So, 124.5, 45639.566546456, 0.9, -45.5 etc... are all examples of real numbers. All real numbers are stored as 64bit floating point values (doubles). Note that you can set a range of values for the output real from the Variable Options (see below for more details).
- Integer: An integer is a whole number and can be positive or negative, for example 30004, 19, 0, -300. Note that you can set a range of values for the output integer from the Variable Options (see below for more details).
- String: A string is anything that has been placed within double quotation marks, for example "fish", "Hello World", or "12345".
- Boolean: A boolean is a value that is either true or false. In the Object Editor Variables window, this is simply shown as a box that you check for true and uncheck for false.
- Expression: An expression is a mathematical phrase that can contain ordinary numbers, variables, strings, or GML functions as well as one or more operators. For example sqrt(85 * 6) + 5.5 is an expression.
- Resource: A resource is simply any one of the resources that you have defined in the resource tree. When you select this resource type, you can then click on the Open Asset Explorer
button to open the Asset Explorer and select the resource you require. Note that you can set filters for the assets shown in the Asset Explorer from the Variable Options (see below for more details).
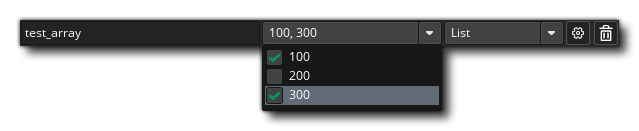
- List: Selecting a list type of input means that you can then create a selection of values (these can be strings, reals, expressions etc...) of which you can then choose one or more for the variable to return. To define the items that go in the list you need to add them into the Variable Options first (see below for more details) and then you will be able to choose the item as the default value for the variable in the main window from the drop down menu:
Note that if you have Multi-select ticked in the List Options (see below) then the variable will become an array of all the selected options.
- Colour: The colour type is for you to define a colour value to be stored in the variable. You can input a real number (from 0 to 16777216, this will have an alpha value of 255), or a hex value (in the format of $RRGGBBAA), or you can double click
Some of the different types of variable will give you options for defining the output value, and you can open these options by clicking
button:
- Real / Integer Options:
The real and integer data types have an option for setting a range of values. When you check this you can then input a start value and an end value and instead of having a fixed value shown for the variable in the Object Variables window, you will have a slider that is clamped to these values:
- Resource Options:
The resource options will open with a list of all the available resource types, and by default they will all be selected. However, you can click
- List Options:
Here you can add the different values that you want to be included as possible return values for the list type variable. You simply click the
If you have checked the option Multi-Select, then the drop down will have checkboxes beside each of the values that you want to have returned by the list variable (and the variable will become an array to hold each of them):
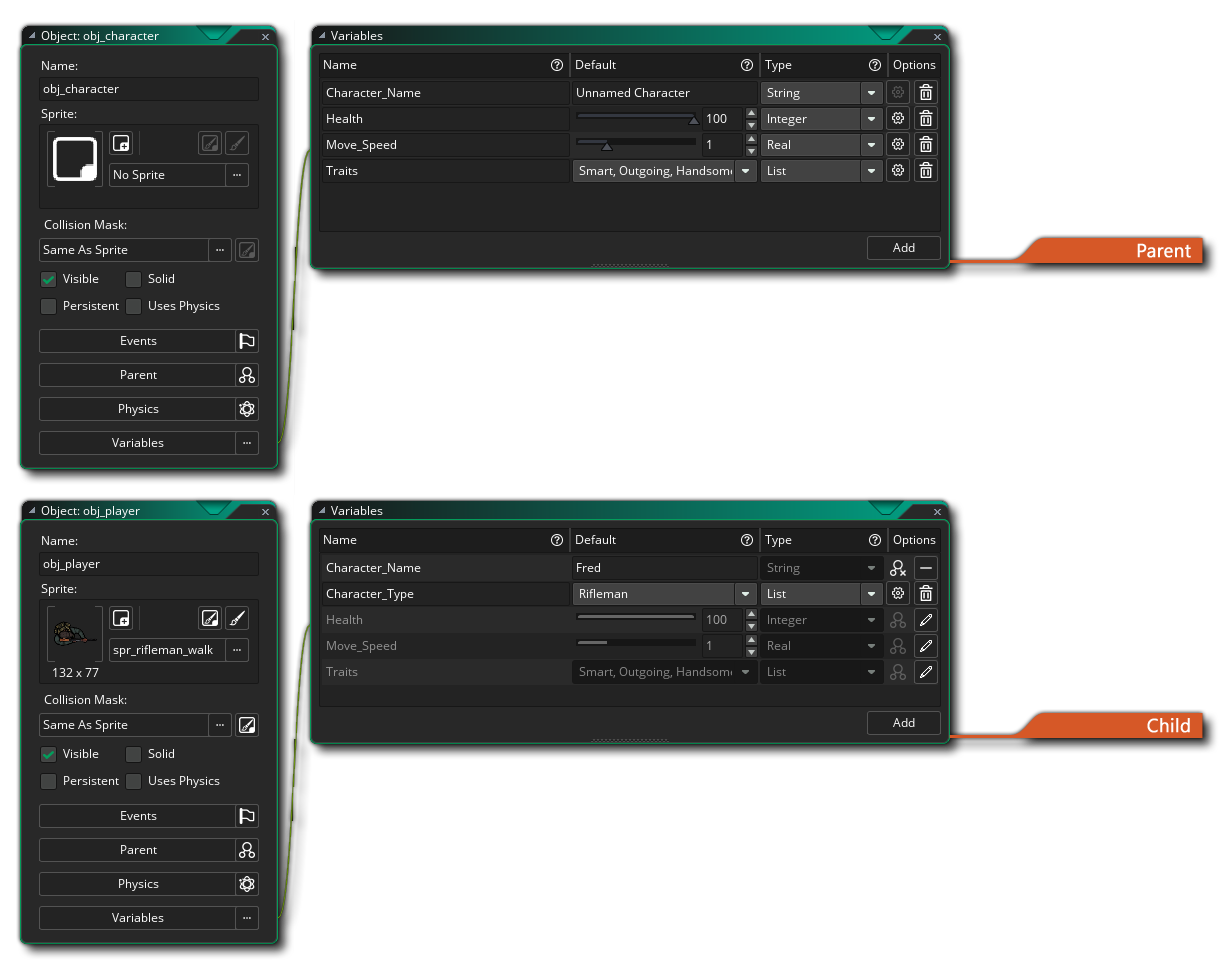
An important feature of the Object Variables is that they are inherited by any child objects that you have in the resource tree (see the section on Parents above), which means that you can then choose to override or change any or all of them if you wish. When you create a child object of another object resource that has Variables defined for it, these will show up in the Object Variables window like this:
You can see in the top image that the Parent object has four Object Variables and in the bottom image these are also shown, only "greyed out" and have the Inherited From Parent
icon to indicate that they have been inherited. These inherited variables can then be edited if you click the Override Variable
button, so you can then adjust the range slider or values, or select different items from lists, etc... Note that when you edit a parent variable you can only change the defined value but not the name, nor can you change the variable options. Also note that you can add in new Object Variables to child objects as well (and in the example image above you can see that "Character Type" is new Object Variable only for the child object).
If you have edited an inherited Object Variable, then you can click the Delete
button to remove the edit, but not the variable. The variable will still be inherited from the parent, but will use the parent default value again. If you need to completely remove the variable, then you must do this from the parent object.