The Texture Group Manager is available from the Tools
Menu in the IDE. Here you can add, delete and rename Texture
Groups. GameMaker Studio 2 permits you to assign each of
the graphics resources (sprites, tilesets, and fonts) to different
texture groups to try and optimise the number of texture swaps that
the hardware does at any given time in your game. For that to work,
you need to define the necessary texture groups from this window,
and then go through each of the appropriate resource types and
select the group you wish it to belong to from the drop down menu.
Alternatively you can add resources to a texture group via the
right mouse button ![]() menu in the resource tree. You
can select one or more resources (or a resource folder) and then
use the RMB menu to add the resources to any group, as shown below
for tilesets:
menu in the resource tree. You
can select one or more resources (or a resource folder) and then
use the RMB menu to add the resources to any group, as shown below
for tilesets: 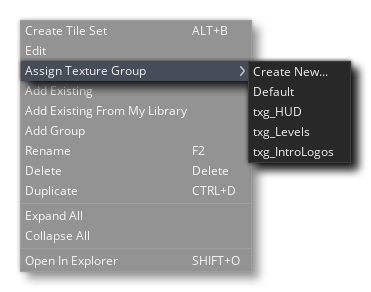
By default all images in your game will be added to the "Default"
texture group, which always exists. However you can click the
Add New button to create a new texture group, and if you
select the name of the group you can change it something
appropriate. To start with the group will show "this group is
empty" for each section of the group (Sprites, tilesets and fonts),
and so you then need to go through your resources and add them. You
can add a resource using the Add resource button at the
bottom, or by selecting the texture group from the resource editor
for the image, tile set, or font. Texture groups other than the
"Default" one can also be deleted at any time, which will move
their contents into the "Default" group (note that if you delete a
group by mistake you can use ![]() /
/![]() +
Z to undo the action).
+
Z to undo the action).
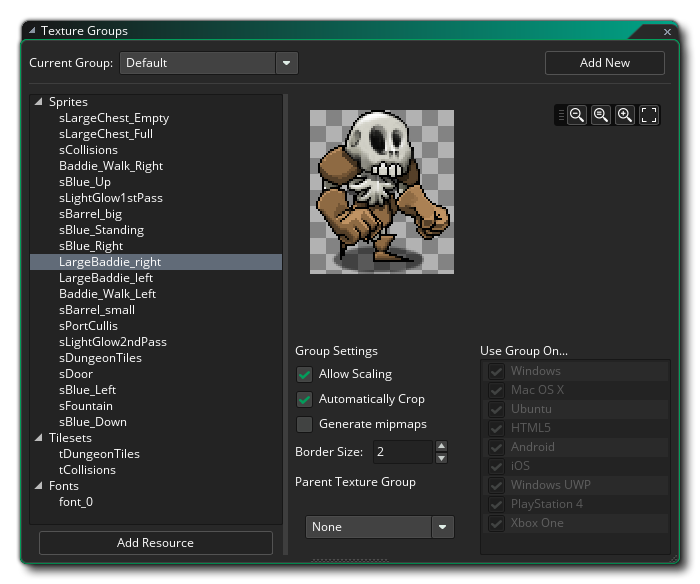
Once you have defined texture groups and assigned sprites to
them you will see them listed on the left of the main Texture Group
editor window, and clicking on any of the sprites in this list will
show them in the image preview window on the right. This is
particularly helpful when working on large projects and you need to
be able to see which sprites have been assigned to which group.
Note that if the sprites assigned to the group have multiple
sub-images (ie: they are animated), then only the first sub-image
is shown in the preview window. You can also right click
![]() on a resource to open a small menu giving you the option to move it
to another texture group or open the editor for that asset.
on a resource to open a small menu giving you the option to move it
to another texture group or open the editor for that asset.
It is worth noting that even though the assets are shown in the list as being separate, all sprites, tilesets and fonts will be added to the same texture page (or pages), and not get an individual page for each resource type.
Group Settings
The group settings are used to determine exactly how the texture pages for a given group should be created with the following options available:
- Allow Scaling - Un-flagging this will force GameMaker
Studio 2 to not scale the texture group under any
circumstances. This can be useful, especially when dealing with
universal apps, as it allows you to put specific resources like
fonts in a group of its own to be used when the app is run on a
specific device. For example, fonts can look great on a retina
display, but when they are scaled down to draw on a normal display
they can look terrible so you can assign them to a special
non-scaling group - if developing for the iPhone 6, you may wish to
have this checked, as apps have been rejected due to the images
being blurred by texture scaling. This is flagged as on by
default.
- Automatically Crop - When you add images into
GameMaker Studio 2 , if they have any "space" around them
(ie 100% transparency) this is automatically cropped when it is
added into the texture page and "Automatically Crop" is flagged.
However, if, for example, you are using the image as a
non-repeating texture for primitives or anything similar, this
means that the UV coordinates for texture mapping are not going to
be correctly represented. In these cases you can un-flag this
option and the sprite will be added to the texture page "as is",
maintaining any transparencies that it may have around the edges.
This is flagged as on by default.
- Generate Mipmaps - Flagging this option (it is off by
default) will tell GameMaker Studio 2 that the original
texture page is to be scaled and filtered into multiple resolutions
within the texture file. This is normally off, but if you are using
views to zoom in or out on large areas of the game room, or you are
working with a 3D game, then you may want to enable this and then
use the Mipmapping
Functions to adjust how the game deals with the different
mipmap levels. When you flag this check box the "Border Size" value
will be set to 8 (if it was set to less than 8 originally). This is
because, when using mipmaps, you need larger borders between images
on the texture pages otherwise they start bleeding together at
higher mip levels. The default value of 8 will allow the image to
be reduced to about an eighth of its original size before the
sub-images start bleeding together, but you can change this to any
value that is required to suit your needs. Note that if you are
using the "Separate Texture Page" option for sprites, then
you do not need to go through each texture here and flag it to
generate mipmaps, but instead you can go to the General Game Options and flag the
option "Generate mipmaps for separate texture pages".
- Border Size - The border size will change the overlap
(or "pixel doubling") amount around the edges of all assets on the
pages generated for the texture group so that when the images are
scaled, there are no gaps (or seams) visible between them. The
default is 2 pixels, but in extreme cases where you are zooming the
view in or out a great deal then you may need to increase this
value. Note that the Tile Set
Editor has an option to set the output border for tiles, and
this is separate to the border setting here - basically, tiles are
generated with an output border for each tile on a temporary
texture, and this is then added to the texture page with the border
given here around the outside edge. Also note that enabling MipMaps
will automatically set the default border size for the texture page
to 8 to help prevent "bleeding" between textures at higher mip
levels, but this can be changed.
- Parent Texture Group - Here you can choose any of the
existing groups to be the "parent" group for the currently selected
one. "Child" groups will inherit any changes made to the parent
texture group and are primarily for resource management when
working with cross platform games. A texture group with a parent is
still a texture group in its own right and will generate texture
pages the same as any other group, but assigning them a parent
allows you to exclude large chunks for different platforms. For
example, you can add a whole load of Android player sprites to a
"player" group, and Android enemy sprites to an "enemy" group, then
make them both use an "android" parent group. If you then exclude
the "android" parent group from the Windows or other platform
build, the child groups will be excluded too.
Other than those settings you can also choose to export (or not) any given texture group to any given platform by simply checking or un-chicking the appropriate boxes from the Use Group On... section of the window. Note though that the <Default> texture group is always exported to every platform, and you can't check/un-check any of them (only custom texture groups permit this).
Configurations
Texture Groups are also linked to the Configurations settings. What this means is that you can define texture groups for each individual configuration of your game, and then set the sprite, tile set or font resource assignments to these different groups and it will be "remembered" when you change to a different configuration. The same will happen to any export options that you have chosen in the Texture Group window, so you can set the texture groups to export to specific platforms on a per-configuration basis.
One use for this is, for example, that you could make an iPad configuration and for that create 2048x2048px texture pages (setting this up via the Game Options). You would then assign all the graphics assets to the appropriate texture group, and when finished, you would then change to a different configuration (for HTML5, for example) and from the Texture Group window, create new texture groups that are 512x512px, assigning the assets to these new groups. There is also a button at the bottom of the page that permits you to copy texture group settings from one configuration to another.