This section outlines the different options available to you that control how your Android game projects will be compiled. The different sections are:
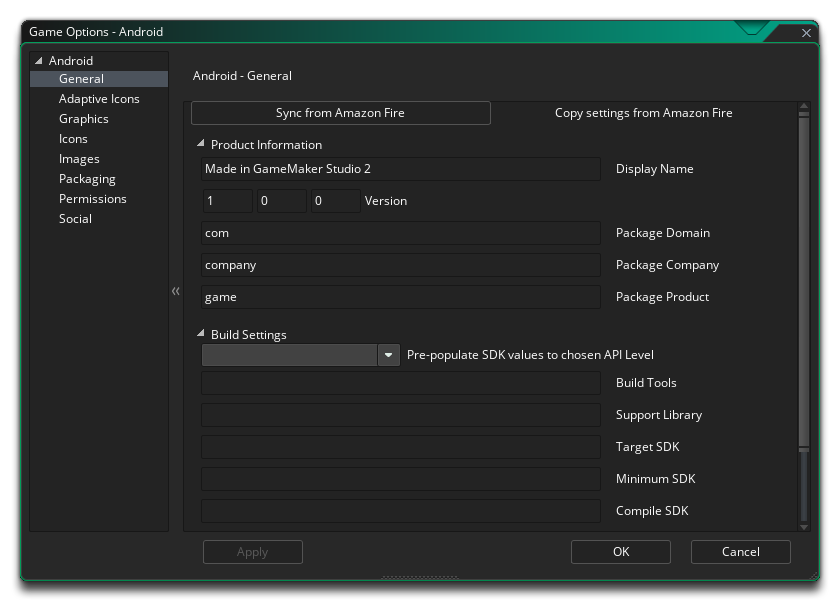
The first part of the General section is dedicated to the Product Information and the Build Settings. You should fill in the Product information, which includes the projects Display Name, its Package information, which consists of a Domain, Company and Product. The package information can only be made up of letters from A-Z and numbers 0-9, with no symbols or other special characters at all, nor should it have uppercase characters. These details will then be used to generate a Package ID with the format "com.company.myappname".
NOTE: If you have already set up the Amazon Fire Game Options, you can click the "Sync from Amazon Fire" button at the top to transfer the relevant information from the Fire options to the Android options.
You then need to set the Build Tools as well as the Target, Minimum and Compile SDK versions.NOTE: There is also an option for the "Support Library" version to use. From GameMaker Studio v2.2.4 and above, this is no longer required and any values used here will be ignored. The setting is maintained for use with legacy projects that require an earlier runtime than 2.2.4.
The Build Tools (and Support Library if required) are used when GameMaker Studio 2 builds your game for the Android target and should be set to appropriate values based on the tools you have installed using Android Studio.The Target SDK indicates that you have tested your app on (up to and including) the version you specify here. This is simply to give the Android OS an idea of how it should handle your app in terms of OS features. For all practical purposes, most apps are going to want to set Target SDK to the latest released version of the API (as used by the Compile SDK setting). This will ensure your app looks as good as possible on the most recent Android devices. Note that from November 2019 Google has made API level 28 the required target.
The Minimum SDK version is the minimum API level that will run your project. From November 2019 Google has made API level 16 the absolute minimum required, but if you add extensions then they may require a higher minimum API level.
The Compile SDK version is the version of the API that the project is compiled against. This means you can use Android API features included in that version of the API. If you try and use API 16 features - for example - but set Compile SDK 15, then you will get a compilation error. However, if you set the Compile SDK to 28 then you can still run the app on an API 26 device (as well as all other previous versions too).
You can select from one of the predefined target settings by clicking on the Pre-populate SDK values to chosen API level button, which will open a list of different APIs to choose from. Selecting any one of them will populate all the SDK files with appropriate values which you can then use or edit as required.
NOTE: You must have installed the appropriate APIs in the Android SDK Manager or through Android Studio for your projects to compile correctly.
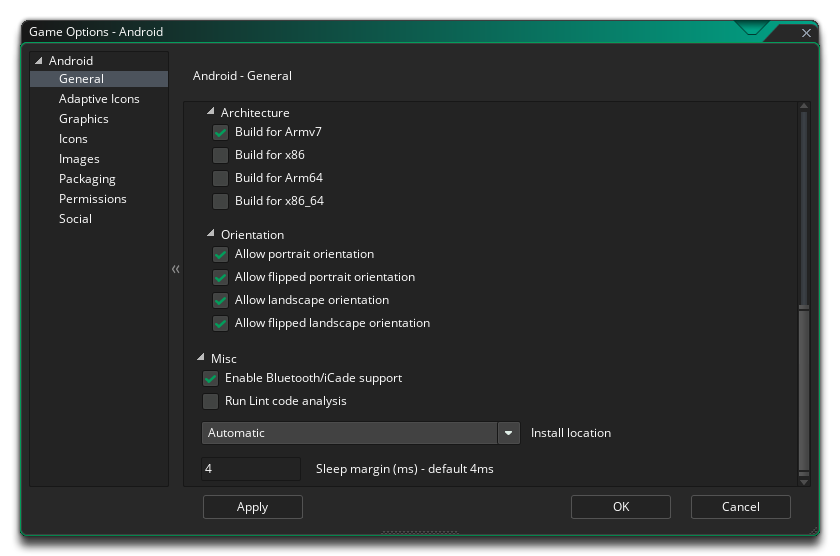
The second part of the General section covers the CPU Architectures to build for, with the following options available (you can select all of them or only those that you require, but note that each one will add to the final size of the compiled apk):
- Build for ARMV5 (checked by default)
- Build for ARMV7 (Checked by default)
- Build for x86 (checked by default)
- Build for Mips (checked by default)
- Build for ARM64
- Build for x86_64
After setting that up you can select the different Orientations that your game can be run on for the best user experience. The available options are:
- Landscape
- Portrait
- Landscape-flipped
- Portrait-flipped
Finally you have the following miscellaneous options:
- Enable Bluetooth/iCade support: This will add support for bluetooth or iCade gamepads to your game project. This is on by default.
- Enable MOGA gamepad support: This will enable support for MOGA controllers. Note that all MOGA functionality is accessed via an extension, and when you first check this option you will be prompted to download and install the MOGA extension from the Marketplace. This option is off by default.
- Run Lint Code Analysis: When this option is flagged, the build tools will run a lint code analysis on the project as it builds, giving a more in-depth error check and showing more information in the output window as the project compiles (a LOG file will be created too, with the path to the file shown at the end of compiling in the Output Window). Note that not everything flagged by lint analysis as an error is necessarily problematic for your game, and having this enabled may mean that your game no longer compiles, even though when it is off, it will compile and run fine. Essentially this is only for debugging, and the option is off by default.
- Install Location: Here you can set the default Install Location for your game. This can either be set to Automatic, in which case the game will be installed to the location chosen by the user on their device, or it can be set to Prefer External which will always try to install the game to the external storage of the device.
You can also set the Android Sleep Margin here. This option is related to reducing stuttering when running your game on specific systems. Basically, if your game is running faster than your room speed GameMaker Studio 2 will "sleep" for the remaining time, but this sleep can be quite inaccurate and you can often end of sleeping for longer than necessary, causing your frame to take longer which causes stuttering. To get around this we can sleep for less time, then sit in a tight loop for the remainder of the time to make it more accurate - although the problem with sitting in a loop is that it causes CPU usage to increase, which in turn can cause your CPU temperatures to rise and your device to use more battery. By default, this value is set to 4, and in 99.99% of the cases you'll be fine with this, but for low end devices or for devices with a lot of background processes running this may not be an ideal solution and a value of 5 up to 10 may be required. Note though that this is very much a device specific configuration and what works on your build device may not be appropriate for another user, and as such if in doubt leave it set to 4.
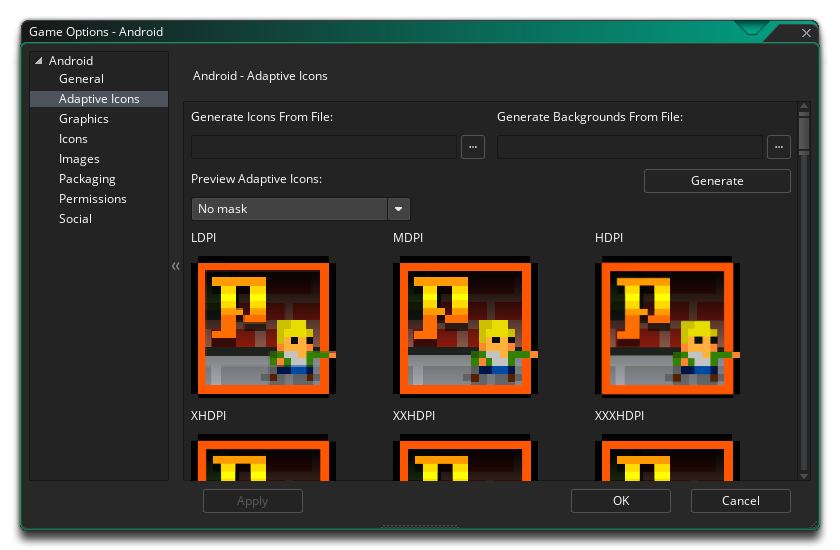
Android 8.0 (API level 26) introduced adaptive launcher icons for your games, and these icons can display a variety of shapes across different device models. To deal with this, you are required to supply a number of foreground and background images for your icons to be displayed at different sizes. These icon sizes are:
- 81x81 pixels (LDPI)
- 108x108 pixels MDPI)
- 162x162 pixels (HDPI)
- 216x216 pixels (XHDPI)
- 324x324 pixels (XXHDPI)
- 432x432 pixels (XXXHDPI)
You can supply each forground and background image individually, or you can choose to Generate Icons From File. This means that GameMaker Studio 2 will generate the required icon images from a base (XXXHDPI) file. You need to supply one image each for the foreground and background and then click the button labeled Generate, and the Icons will be created for you.
Note that your adaptive icons may be masked on any given device and so you also have the option to see how they'll look along with these masks from the Preview Adaptive Icons menu:
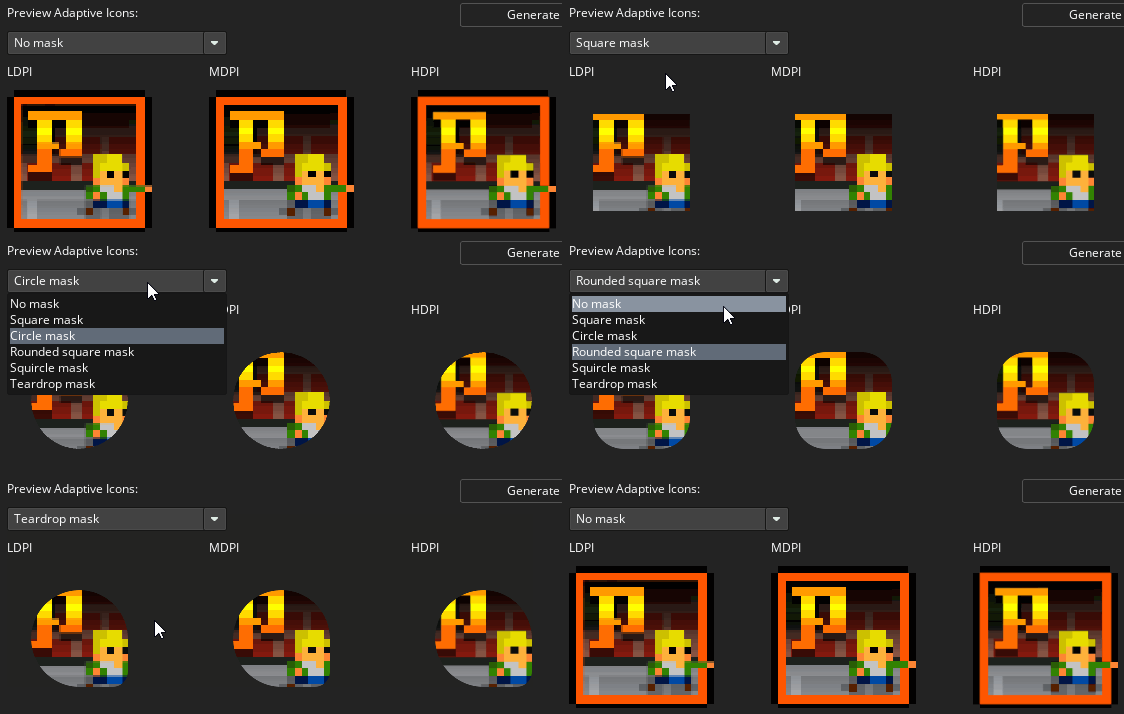
Note that this is simply a preview of how the icon could look with the selected mask, and the setting will not affect how the icons are exported and displayed, as that is up to the device and OS the game will be run on.
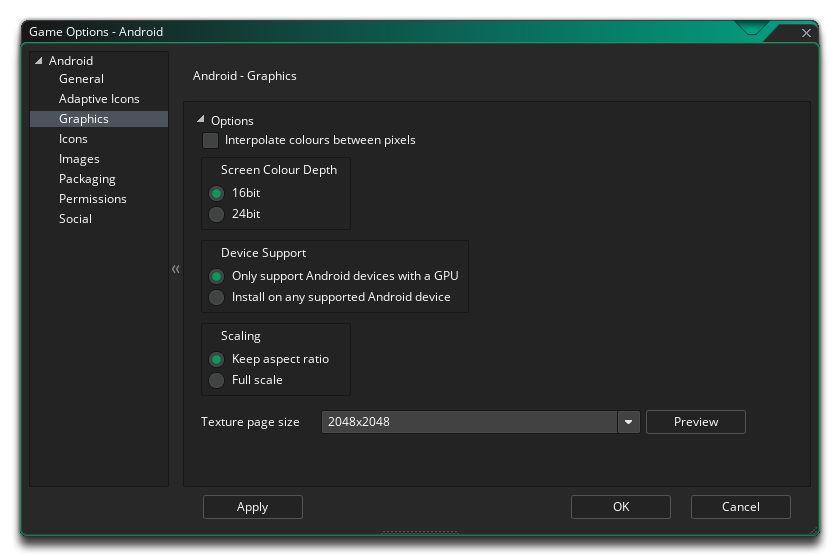
Here you can change the following details related to how your game will be displayed, with the following options available:
- Interpolate colours between pixels: Turns on interpolation, which basically "smooths" pixels. for crisp pixel graphics, it should be off, but if you have nice alpha blends and smoothed edge graphics it is better left on. Default is off.
- Screen Colour Depth: This can be used to set the colour depth for rendering to either 16bit or 24bit. This will affect the compatibility with some older devices if it is set to 24bit, and will also increase the ashmem that is needed (this is the shared memory on Android devices).
- Device Support This option will set whether to support only devices that have a dedicated GPU, or all devices. Basically, if your game has any advanced drawing functions like alpha blending, additive blending, surfaces, etc... you should limit it to those devices that have a GPU otherwise you run the risk of getting negative comments and poor rating for your game due to graphical errors or crashes on older devices.
- Scaling: Here you can select to scale the draw canvas maintaining the aspect ratio within the device screen - adding "padding" around the edges to fit the screen - or you can select to have the draw canvas stretched stretch to fit.
Finally there is the option to set the size of the Texture Page. The default (and most compatible) size is 2048x2048, but you can choose from anywhere between 256x256 up to 4096x4096. There is also a button marked Preview which will generate the texture pages for this platform and then open a window so that you can see how they look. This can be very useful if you wish to see how the texture pages are structured and to prevent having texture pages larger (or smaller) than necessary.
NOTE: Be aware that the larger the size of the texture page, the less compatible your game will be.

This section permits you to add the various icon images that your project will need for the different store pages and devices. All icon images should be created as 24bit PNG files of the appropriate sizes given.
It is worth noting that GameMaker Studio 2 has a Project Image Generator tool which can be used to automatically create all the icons required for all the different target platforms your game is being compiled to. If you use this tool, you should revise the images created to ensure that they are what you require.
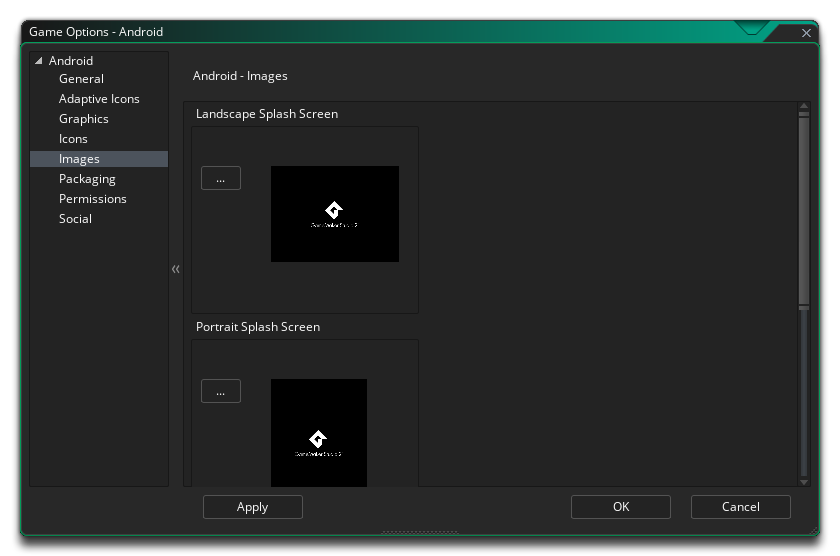
Here you can add a splash screen to your final game file, for both landscape and portrait modes, which will be shown while the game loads on the device. This screen should be a 24bit PNG file, and is recommended to be the same size as the first room (or view) of your game. If you require that the splash screen be shown for a specific time then you can also set it here from 0 to 10 seconds (the default time of 0 means that it will only show for the duration of the asset loading).
IMPORTANT! On very old and very low end devices, a splash screen greater than 1024x768 may cause an out of memory error.
It is worth noting that GameMaker Studio 2 has a Project Image Generator tool which can be used to automatically create all the images required for all the different target platforms your game is being compiled to. If you use this tool, you should revise the images created to ensure that they are what you require.
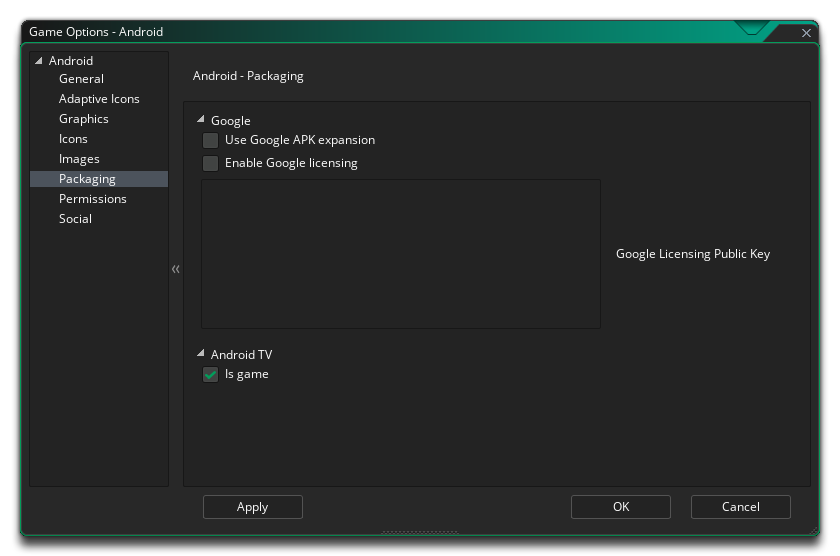
One of the features of using Google Play for your Android games is the ability to licence your games. This means that your games will be controlled by Google so that only people that have downloaded it through their market will be able to play the game, thus avoiding illegal copies of your product from getting distributed.
To activate this function in your game, you must first flag the Enable Google Licensing box and then copy your Public Key into the box labelled Google Licencing Public Key. This licence can be found by going to your Google Play Developers Page and then selecting the game you wish to edit. Once on the game profile page, scroll down to the section titled "Services & APIs" and there you should find the Public key that is needed for this functionality to be enabled.
Once activated, if anyone who is not authorised to posses your game tries to play it, they will be shown a pop-up message box that will inform them that the Licence cannot be found on their device, and then give them the option to retry and test again, or exit the game.
Another feature of Licensing is that your game can then use APK Expansions. This is a way to bypass the 50MB maximum application size imposed by Google Play (and only Google Play). It will create your game in two parts: a small *.apk file and a larger *.zip file which will hold all your games assets, both of which are uploaded to the store. When the user first runs your game, the zip will be downloaded and unpacked. You can find further details of this option here.
Finally, you have the option to prepare the final app package as an Android TV game (you should only tick this if your game conforms to the Android TV guidelines).
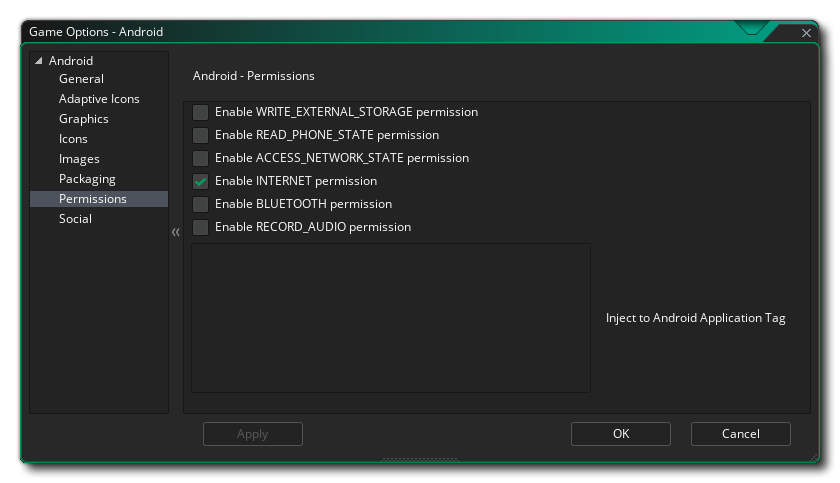
From this tab you can change some of the permissions that your game may request within the Android Manifest. GameMaker Studio 2 will allocate permissions automatically as required, however you may find you require a permission for your game that hasn't been correctly assigned (for example, when you use custom extensions) in which case tick the requisite permission box. The list below outlines those that are available:
- WRITE_EXTERNAL_STORAGE: Will permit your game to write to external storage.
- READ_PHONE_STATE: Allow read only access to the phone state.
- ACCESS_NETWORK_STATE: Permit your game to access information about networks.
- INTERNET: Permit your game to open network sockets.
- BLUETOOTH: Will permit your game to connect to paired Bluetooth devices.
- RECORD AUDIO: Will permit your game to record audio input from the microphone.
NOTE: If you are not sure that you need these, you should probably just leave them un-checked by default and let GameMaker Studio 2 deal with the permissions for your game.
The Android Permissions secton also has an area where you can inject permissions into the Android Application Tags in the Androidmanifest.xml. You can find a full list of available tags from the Android documentation here: Android Developer: Application Tags. It is worth noting that for target API 28 and above, you will no longer be permitted to use any external web calls using "http" ("https" is required instead) unless you add the following tag:android:usesCleartextTraffic = "true"
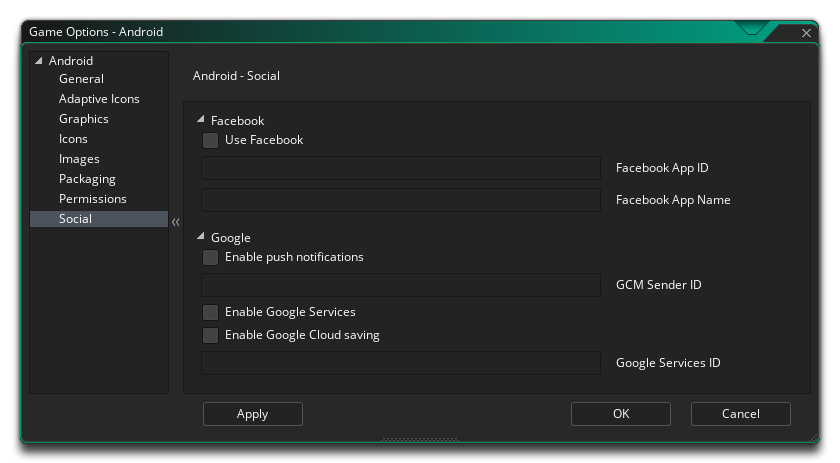
This section is for enabling different Social features in your Android game. The following options can be chosen:
- Facebook: If you require the Facebook functions, you need to select this checkbox and then supply the Facebook App ID and Facebook App Name. Note that all Facebook functionality is accessed via an extension, and when you first check the Use Facebook box you will be prompted to download and install the Facebook extension from the Marketplace.
- Google - Enable Push Notifications: In order for your game to use Push Notifications they must be enabled here first otherwise they will not work. Local notifications on Android do not require the "GCM Sender ID", but you must add it should you wish to create remote notifications.
- Google - Enable Google Services: If you want to enable achievements and leader boards for the Google app store, then you need to check the Enable Google Services checkbox. Once you have selected this you will be prompted to download and install the corresponding extension from the Marketplace, and then code the functionality into your game using the extension boards functions. Note that if you use Google Play you will need to add your App Id into this tab for the services to work (this can be found from your Google Play Developers dashboard).
- Google - Enable Cloud Saving: Checking this will enable Google Cloud Saving, and (as above) will prompt you to download and install the relevant extension from the Marketplace. See the section on Cloud Saving from the Asynchronous Functions page.