GameMaker Studio 2 is not just limited to the resources that you create within the program. It has a special section in the resource tree of the main window for Included Files. Here you can load different file types (and even create sub-directories for them) into GameMaker Studio 2 and they will then be included in the final game as part of the package for the chosen target platform. So, for example, in a windows game they will be bundled within the *.exe and exported when run, or in HTML5 they will be included in the html5_game folder and stored on the server.
To add a file to your resources you must right-click ![]() on the
Included Files section of the resource tree and select
Insert Included File or, if you want to create a
sub-directory to store other files, Create Group. This will
then prompt you to add a file, or files if you select more than
one, to the list. Once they have been added you can right-click
on the
Included Files section of the resource tree and select
Insert Included File or, if you want to create a
sub-directory to store other files, Create Group. This will
then prompt you to add a file, or files if you select more than
one, to the list. Once they have been added you can right-click
![]() on it and select Properties to edit the properties of the
file.
on it and select Properties to edit the properties of the
file. 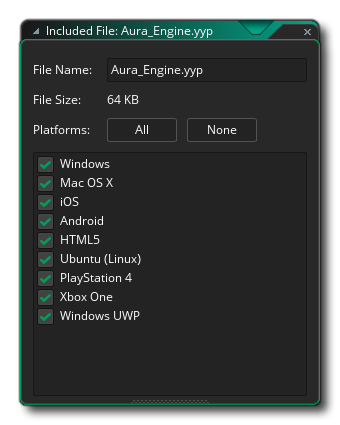 Here you can rename the file if you
choose by changing the File Name. Beneath the file name
there are also a series of options for the target platform that
this included file should be copied to. If you wish it to be only
exported when you run the game in a browser, then you would only
tick the HTML5 box, and if you want it to be exported only to
Android and iOS targets you would tick those, and so on. If you
choose not to tick any targets then that file will not be exported
at all. This option is especially useful for those that wish to
make use of the Configurations Manager to store certain
configurations and export specific files depending on them (click
on the configuration you wish to use, check/un-check the platforms
you require and then if you change configurations the files
selected for each one will be remembered).
Here you can rename the file if you
choose by changing the File Name. Beneath the file name
there are also a series of options for the target platform that
this included file should be copied to. If you wish it to be only
exported when you run the game in a browser, then you would only
tick the HTML5 box, and if you want it to be exported only to
Android and iOS targets you would tick those, and so on. If you
choose not to tick any targets then that file will not be exported
at all. This option is especially useful for those that wish to
make use of the Configurations Manager to store certain
configurations and export specific files depending on them (click
on the configuration you wish to use, check/un-check the platforms
you require and then if you change configurations the files
selected for each one will be remembered).
Once you click on "OK" the file will be stored with your current project in its own folder called data-files found in the project directory. If you have chosen to change the name of the file when you added it to the resource tree, then the file will now be stored with that new name. Please note that from now on you should edit the files stored in this folder and not the original files (unless you plan on including them again, but generally there is no need).
For further information on how included files are stored with your game and how they are accessed please see the section of the manual dedicated to the File System.
It is worth noting that you can include DLL (on WIndows) or DyLib
(on macOS) files as included files and then create your own custom
functions to deal with them using
external_define. These can then be used calling the
external_call function.